How to Find your Adsense ID Number

How to Find your Adsense ID Number

This topic is written specifically for potential writers on Girl Gamer and Anime Girl, but can be applicable to anyone who is guest authoring on other blogs, or is a contributing author and needs their Adsense Publisher ID. This is used specifically in the Sexy Author Plugin for WordPress that allows authors to get paid via Adsense based on the number of view their articles get.

Step 1.) Create an Adsense Account at http://AdSense.Google.com. If you do not have an Google or Gmail account, create a new one.

Step 2.) Under Step 2, Google asks “I will show ads on:” This field is either http://GirlGamer.org or http://AnimeGirl.org. Content Language is “English”

How to Find your Adsense ID Number

Step 3.) Fill in your Contact Information

Google Adsense Page 2

Step 4.) Wait for Google to approve your request

Step 5.) Once they have done so, log in to your Adsense Account and click on the sprocket icon in the upper right hand corner.

Google Adsense Page 3

Step 6.) Click on “Account Information” on right side of the screen.

Google Adsense Page 4

The Adsense Publisher ID is at the top and starts with “pub-“. So that is How to Find your Adsense ID Number! Pretty simple!

How to: Fix Kenwood Stereo MP3 file errors

I recently got a new (well, apparently from 2012,) Kenwood Stereo. The exact model number is the KDC-X498, but from my research most of the Kenwood stereos are pretty similar. It’s a pretty cool stereo as it has a USB port on it. I can plug in any phone with a USB cable and it’ll play music from it. It will also play MP3 files from a USB Drive.

Unfortunately there are a number of caveats to make this possible;
– The USB Drive is limited to 32GB in size
– The USB Drive must be formatted in Fat 32. Most are this way from the factory, so usually not a huge deal.
– Audio files must be in .mp3 format or .wav format. Some models will accept the .acc format also.
– Some stereos can only see a certain number of MP3s per a directory on the drive. Its roughly a thousand files, but on a 32GB drive that is easy to reach. If this happens, separate the files out into subdirectories. Or as I do, by Artist then Album.
– MP3s must be in 192k format. Not 320k VBR or some other format.

Despite all of this, my stereo (and several other models,) will suddenly display “NA File” while reading a USB drive full of MP3 files. After a lot of searching on the internet, most said to make sure that it’s in the right format. Well, I run a Mac, and spent several hours downgrading all my files to 192k yet still had the problem. After several more hours of searching and no answers at all, I finally figured out the problem.

The Kenwood Stereo’s firmware does not “skip” over the Macintosh’s .DS_Store files like every other operating system has been doing for years. Modern OSes see any file starting with a . (or period,) as a system file and ignores it, or processes it as appropriately. Not the Kenwood!

So to fix this, these can be disabled in the command line using these directions I wrote years ago.

Or, it’s easy to open up Terminal in OS X, and type ‘rm -rf ._*’ (without quotes.) This will delete all the .DS Store files and everything will magically work! Make sure you cd to the correct directory first , usually /Volumes/Crucial or something similar.

How to: Stop Semalt Referral Spam

Recently, a company called “Semlat” has software bots crawling websites all over the world. They state that you can remove yourself from their list, but so far I’ve not heard of anyone actually getting off the list. They claim to be an SEO company, but their practices of getting to the top are somewhat black hat.

6976481_orig

Even worse, they are no longer the only ones. The list of “companies” that do this has grown huge in just the past month! A partial list of these companies is:

  • buttons-for-website.com
  • 7makemoneyonline.com
  • darodar.com
  • semalt.com
  • ilovevitaly.co
  • myftpupload.com
  • econom.co
  • iskalko.ru
  • ilovevitaly.ru
  • ilovevitaly.com
  • o-o-8-o-o.ru
  • o-o-6-o-o.ru
  • cenoval.ru
  • priceg.com
  • cenokos.ru
  • seoexperimenty.ru
  • gobongo.info
  • vodkoved.ru
  • adcash.com
  • websocial.me
  • cityadspix.com
  • luxup.ru
  • ykecwqlixx.ru
  • superiends.org
  • slftsdybbg.ru
  • edakgfvwql.ru
  • socialseet.ru
  • screentoolkit.com
  • savetubevideo.com
  • There is some speculation that these bots are also looking for weaknesses on sites to exploit. Even if it’s not true, it’s still a good idea to block them because it messes up Google Analytics reports and puts an unnecessary load on your server.

    There are a number of ways to block these, or filter out their traffic. But the best two methods both involve adding fields to the .httaccess file on your server. Do this by:

    1.) Log into your host’s cPanel.
    2.) In the Files section, click on the File Manager icon. (you may have multiples)
    3.) Check the box for Document Root for and select the domain name you wish to access from the drop-down menu if there is more then one.
    4.) Click the box that says “Show Hidden Files (dot files)” – this is the critical step
    5.) Click Go.
    6.) Scroll down to .htaccess in the list of files.
    7.) Highlight and click copy at the top of the screen
    8.) Type in .httaccess.back and hit enter (this creates a backup, just in case)
    9.) Highlight .httaccess and click “edit” at the top of the screen
    10.) Paste one of the two following sections of code into the file, typically at the bottom.
    11.) Click Save
    12.) Access your site in a separate browser or browser window to make sure you can still access the website. If you can, all is good. If not, edit .httaccess again and remove that parts you just added.

    Code #1

    – this is a bit less elegant but is very direct:


    SetEnvIfNoCase Referer semalt.com spambot=yes
    SetEnvIfNoCase Referer buttons-for-website.com spambot=yes
    SetEnvIfNoCase Referer darodar.com spambot=yes
    SetEnvIfNoCase Referer 7makemoneyonline.com spambot=yes
    SetEnvIfNoCase Referer ilovevitaly.co spambot=yes
    SetEnvIfNoCase Referer myftpupload.com spambot=yes
    SetEnvIfNoCase Referer econom.co spambot=yes
    SetEnvIfNoCase Referer iskalko.ru spambot=yes
    SetEnvIfNoCase Referer ilovevitaly.ru spambot=yes
    SetEnvIfNoCase Referer ilovevitaly.com spambot=yes
    SetEnvIfNoCase Referer o-o-8-o-o.ru spambot=yes
    SetEnvIfNoCase Referer o-o-6-o-o.ru spambot=yes
    SetEnvIfNoCase Referer cenoval.ru spambot=yes
    SetEnvIfNoCase Referer priceg.com spambot=yes
    SetEnvIfNoCase Referer cenokos.ru spambot=yes
    SetEnvIfNoCase Referer seoexperimenty.ru spambot=yes
    SetEnvIfNoCase Referer gobongo.info spambot=yes
    SetEnvIfNoCase Referer vodkoved.ru spambot=yes
    SetEnvIfNoCase Referer adcash.com spambot=yes
    SetEnvIfNoCase Referer websocial.me spambot=yes
    SetEnvIfNoCase Referer cityadspix.com spambot=yes
    SetEnvIfNoCase Referer luxup.ru spambot=yes
    SetEnvIfNoCase Referer ykecwqlixx.ru spambot=yes
    SetEnvIfNoCase Referer superiends.org spambot=yes
    SetEnvIfNoCase Referer slftsdybbg.ru spambot=yes
    SetEnvIfNoCase Referer edakgfvwql.ru spambot=yes
    SetEnvIfNoCase Referer socialseet.ru spambot=yes
    SetEnvIfNoCase Referer screentoolkit.com spambot=yes
    SetEnvIfNoCase Referer savetubevideo.com spambot=yes
    Order allow,deny
    Allow from all
    Deny from env=spambot

    New SPAM bots can be added easily to this list by just cutting and pasting the domain name.

    Code #2

    – Little more elegant. This is the one I went with. It is provided by Perishable Press.


    # 5G:[WordPress]

    RedirectMatch 403 /\$\&
    RedirectMatch 403 (?i)/\&(t|title)=
    RedirectMatch 403 (?i)/\.(bash|git|hg|log|svn|swp|tar)
    RedirectMatch 403 (?i)/(1|contact|i|index1|iprober|phpinfo|phpspy|product|signup|t|test|timthumb|tz|visit|webshell|wp-signup).php
    RedirectMatch 403 (?i)/(author-panel|class|database|manage|phpMyAdmin|register|submit-articles|system|usage|webmaster)/?$
    RedirectMatch 403 (?i)/(=|_mm|cgi|cvs|dbscripts|jsp|rnd|shadow|userfiles)

    This second version should work a little better since instead of blocking the bots, it gives them an official 403 not found. That should keep the bots from hitting your site at all in the future and reduce load even more.

    Since I’ve implemented this method, I have seen Semalt (and all the others,) go away completely. I still get an occasional iffy one but it’s not as bad as the 10-15 (per a site) I was getting before.

    Do you have another solution that works better? Please comment below!

    How To Fix: H4ck3d by R3d Dr4GoN

    How To Fix: H4ck3d by R3d Dr4GoN

    This happened to me on both of my WordPress blogs, this one, and Pacific Northwest Photoblog. This could happen to any site though, not just WordPress sites.

    How To Fix: H4ck3d by R3d Dr4GoN

    First off, do not panic.

    Either way clearing this up is pretty easy. In both cases there was a 301 Redirect in my .htaccess file on the very first line. I removed this and was able to get to sub pages. The main page continued to be a problem though. Looking closer I found that I had an index.php and index.html page. Since WordPress renders completely in PHP, the presence of Index.html was a bit strange. Taking a look at it I found:

    HTML>
    
    H4ck3d By R3d Dr4GoN


    This Site Is

    Very clearly this is incorrect. So I renamed Index.html to Index.hack, refreshed my main and everything was back to normal! After this be sure to change the password to your terminal/ftp user, create new SSH keys or create new ones if you don’t have any, and just to be safe, change your WordPress blog admin password.

    While the actual hack was pretty amateurish, and was likely done by a script that exploited known security issues, it shows just how important proper security is in this day and age. And more importantly, it shows that no matter what you know, and how much you prepare – you will get hacked someday.

    How To: Streamline WordPress by removing Database calls

    How To: Streamline WordPress by removing Database calls

    *Warning – the following instructions involve editing PHP code. Doing so incorrectly can mess up a working blog very badly. Only attempt if you are confident you know what you are doing.*

    One of the powers of WordPress is that it is very customizable with thousands of themes and as many plugins. A lot of this customization is done via generic database calls that store the required information. This has two advantages, theme designers know exactly what calls to make so that a blog shows all the required information. And this allows blog admins to quickly and easily flip between themes with no configuration needs afterwards.

    But the downside is that a blog makes over a dozen database calls just to bring up a single web page. Many of these are stored in the header.php and footer.php files and only shows such information like the blog name, title, and dynamic links to resources pulled up every time. By removing these database calls and hardcoding the links we can not only streamline and quicken webpage loading, we can also reduce the number of database calls a page needs.

    Note that several themes will update automatically occasionally. This will remove any changes you’ve made. The best suggestion is to copy your preferred theme to a new theme directory and call it a different name, then make the new theme your active one that you’ll streamline.

    Here is the Header.php file from the “life-is-simple” WordPress Theme. This is a pretty simple and generic theme so it makes a good example.


    <html xmlns="http://www.w3.org/1999/xhtml" >
    
    <meta http-equiv="Content-Type" content="
      ;
      charset=" />
     
    <meta name="generator" content="WordPress " />


    @import url(  );
    
    
    <link rel="shortcut icon" href="/icon.png" type="image/x-icon" />
    <link rel="pingback" href="" />


    <body >


    I highly suggest changing one line at a time and testing it before going on to the next. This will help find any errors that popup through misplaced tags.

    In the WordPress world, <?php denotes a database lookup of some sort. These are the lines that we want to try to remove as much as possible, but there are a few other locations we can clean up also.

    <html xmlns="http://www.w3.org/1999/xhtml" >
    
    <meta http-equiv="Content-Type" content="
      ;
      charset=" />
    

    can be streamlined to:


    All we did was remove the database lookup by hard coding the variables that would have been found. It’s critical to note that the charset maybe different for your blog depending on the language of the blog. The exact charset you should use is beyond the scope of this post, if you want to know more about charsets, here are some good links:
    WordPress Database Charset and Collation Configuration
    How to Avoid Character Encoding Problems in PHP
    Seeing Weird Characters On Your Blog? Here’s How To Fix Your WordPress Character Encoding (Latin1 to UTF8)

    For SEO reasons, we probably want to keep the next php lookup:

    <meta name="generator" content="WordPress " />
    

    But the title lookup can streamlined drastically


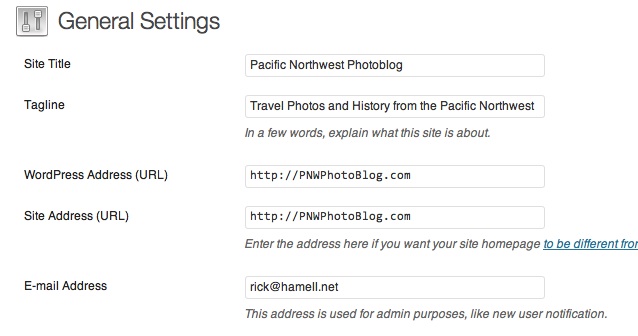
    As the blog author we know what the page title (wp_title,) and bloginfo already are – in fact when first setting up WordPress these were likely two of the very first things entered. Just in case it’s needed, these are under General -> Settings. The page title is “Site Title,” and bloginfo is the “Tagline” field.

    How To: Streamline WordPress by removing Database calls

    So we can minimize this line to:

    Pacific Northwest Photoblog - Travel Photos and History from the Pacific Northwest
    

    The next line we can remove is the favicon, this is the 16×16 pixel icon that shows in the address bar and is saved when a page is bookmarked. The actual name can change from theme to theme, but it will always be located in the theme directory under wp-content. So this line:

    <link rel="shortcut icon" href="/icon.png" type="image/x-icon" />
    

    becomes:


    The icon may also have an .ico extension, or it can be something called favicon.png.

    The next database lookup finds the pingback url. Note that this is an href= link that is looking for an html link, the database lookup simply grabs the webpage url, then appends /xmlrpc.php to it. All we do is add the link ourself.

    <link rel="pingback" href="" />


    In the original code above, the next database lookup is a critical one. This brings up the actual “body” of the blog. This could a static page, or a list of posts, depending on what settings were chosen in the blog. Either way, skip over the following database lookup because it is hugely critical.

    <body >
    

    In the header wrapper though, we have another familiar line:

    <a href="/">

    This is almost exactly the title line from above, but with an href link to the home page in it.

    Pacific Northwest Photoblog

    Travel Photos and History from the Pacific Northwest

    At this point the header.php file is streamlined quite significantly. Next we go to the footer.php file as there is a couple more database lookups we can hardcode here also.

    Original footer.php file:

    As you can quickly see there is another “bloginfo” lookup here including an HTML link, just like the title lookup had in header.php.

    Pacific Northwest Photoblog .  <?php _e('"Life is Simple" is a simple theme for WordPress, powered by Chereshka.', 'life-is-simple'); ?>
    

    Some people would suggest removing the link to the Theme artist if it exists, along with other “useless” information. Personally I prefer to leave it to give credit to the people who provided the theme for free, but it does take a little resources to serve up. Every line removed decreases the load time slightly and will make a big difference if a blog is getting thousands of hits at once.

    But we can do one other thing – remove the year lookup as defined by this piece of code:


    I wanted to add my copyright blurb here so changed the code to:

    Pacific Northwest Photoblog Copyright Rick Hamell 2006-2014.  <?php _e('"Life is Simple" is a simple theme for WordPress, powered by Chereshka.', 'life-is-simple'); ?>
    

    Some blogs will have an RSS feed link in this area. For posts this typically look like


    And for comments the RSS Feed typically looks like this


    My rss feed is http://PNWPhotoBlog.com/feed/ . But RSS Feeds can look a little different, especially if you use Feedburner. So be sure to check the exact link before editing the code.

    Personally I do not care if people subscribe to my comments via RSS, but I would like more readers to subscribe to my general RSS feed. My full code now looks like this:

    Pacific Northwest Photoblog Copyright Rick Hamell 2006-2014.  Subscribe via RSS
    
    <?php _e('"Life is Simple" is a simple theme for WordPress, powered by Chereshka.', 'life-is-simple'); ?>

    For perspective, this is what my footer now looks like:
    How To: Streamline WordPress by removing Database calls
    You can see how I have two links in here, one that goes to the home page, and one that allows users to subscribe to my RSS feeds.

    By these directions we’ve removed sixteen full database lookups! This halved the loading time of my webpage, PNWPhotoblog.com. That is quite a difference, don’t you agree?

    Thanks to Joost de Valk “Yoast” for his very informative blog post “Clean up you theme” that inspired this post. If you have any comments, suggestions, questions, or want to correct my code, please leave a comment below.